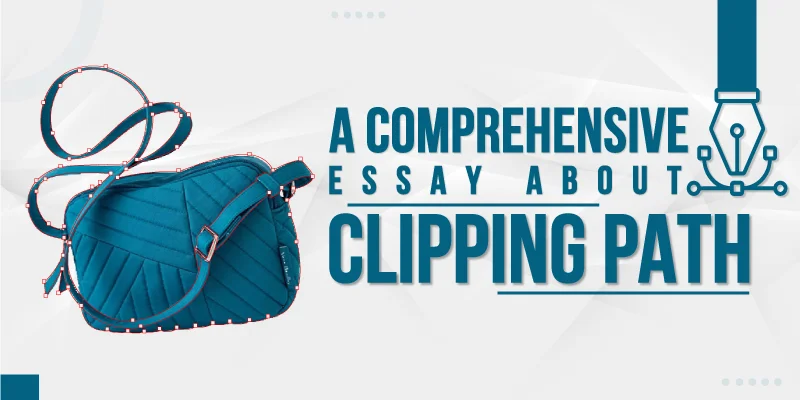
In the world of pictures and designs, there’s a cool tool called Clipping Path. It helps to cut out parts we want from a picture and leave the rest behind. Back in the old days, people had to cut pictures with real scissors! But now, with computers and software like Photoshop, we can do it super easily. Clipping Path grew up with technology, making it better and cooler.
Using clipping path is like uncovering a magic trick to make pictures look amazing. In this intro, we’ll learn the basics of photo clipping. You will be able to understand why it’s important for making graphics and photos cool and see how it has changed over time.
What is Clipping Path

A Clipping Path is like a digital pair of scissors for pictures. It helps to cut out a special part of a picture so that it stands on its own. This makes it easy to remove backgrounds or make things look cool in ads or photos. People use Clipping Path to make pictures look awesome, especially in things like ads or online shops. It’s like magic for making pictures stand out!
Types of Clipping Paths
There are so many different types of Clipping Paths. Each type offers a different photo clipping service. Here we have discussed some of them.
Basic Clipping Path
A basic Clipping Path is like using easy scissors for simple shapes. It’s great for cutting out things with straight lines, like boxes or simple objects.
Complex Clipping Path
If you have a picture with lots of twists and turns, you need a complex Clipping Path. It’s like using detailed scissors for pictures with lots of curves and tricky parts. Perfect for cutting out things like detailed jewelry or intricate designs.
Compound Clipping Path
When your picture has many different things, a compound Clipping Path is handy. It’s like using scissors that can cut out many parts in one go. Useful when you want to separate and edit different objects in the same image.
Multiple Clipping Paths
: For separate edits in different parts of a picture, use multiple Clipping Paths. It’s great for adjusting and enhancing various elements individually.
Color Path
Color Clipping Path is like a magical paintbrush for changing or making colors pop. It helps focus on enhancing or altering the color of the clipped object.
Silhouette Clipping Path
Silhouette Clipping Path is like cutting out the outer edge of an object. It leaves the object against a see-through background, like a shadow. Perfect for creating cool effects and emphasizing the main subject.
Tools for Clipping Paths
Creating awesome pictures needs the right tools. In image editing, knowing about the tools for clipping paths is super important. These tools help us cut out things and make backgrounds look smooth. Let’s check out the basic tools that make clipping paths easy and our pictures look great.
Pen Tool
The Pen Tool is like a digital pencil for drawing careful lines around things. It’s super good for making exact outlines, especially for tricky shapes. Pros love it because it helps make images look super neat.
Lasso Tool
The Lasso Tool is like a magical rope for quickly picking out things in a picture. It’s great for grabbing stuff with wiggly edges or when you just want to keep things simple. Easy and quick, especially for less detailed shapes.
Magic Wand
The Magic Wand is like a smart helper that picks out areas with similar colors. It’s awesome when you want to grab parts of a picture that look similar. Makes selecting things super fast and easy.
Path Selection Tool
The Path Selection Tool is your buddy for fixing and adjusting lines you draw with the Pen Tool. It helps make sure everything lines up perfectly. Great for making sure your cutouts look just right.
Eraser Tool
The Eraser Tool is like a digital eraser for fixing mistakes or cleaning up lines. It’s perfect for getting rid of extra bits and making edges smooth. Helps make your cutouts look polished and clean.
Brush Tool
The Brush Tool is like a tiny digital paintbrush for adding or removing parts of your lines. It’s awesome for detailed tweaks and making sure your cutouts match the tiny details. Pros use it for a super accurate finish.
How to make a perfect clipping path in Photoshop?
Clipping paths may sound mysterious to many of us, but here we present it in some easy steps. By following these instructions, you can create a clipping path very easily.
Step 1: Open Your Image
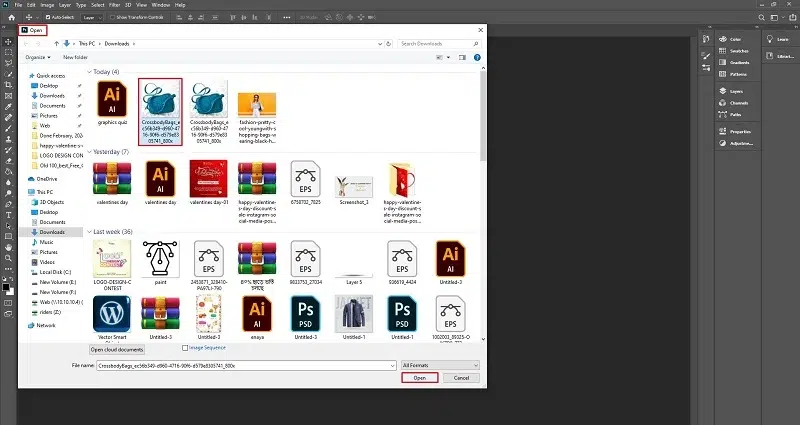
Launch Photoshop and open the image you want to work on. This sets the stage for creating your Clipping Path.
Step 2: Select the Pen Tool
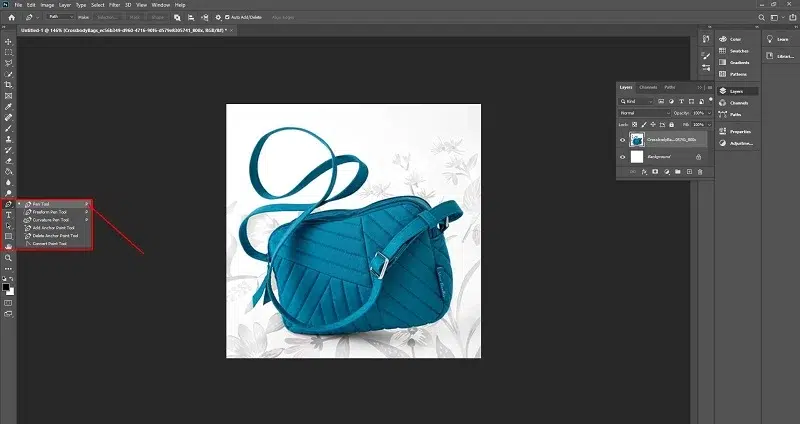
Choose the Pen Tool from the toolbar. It’s typically represented by an icon resembling a pen or quill.
Step 3: Zoom In for Precision
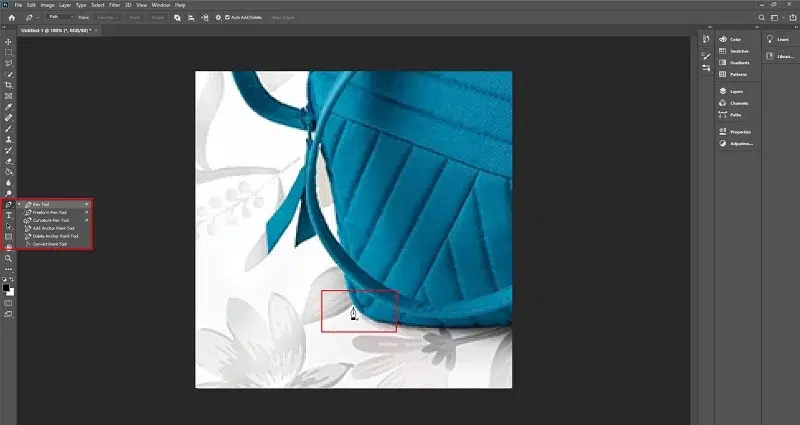
Get a closer look by zooming into your image; this ensures precise work, especially with intricate details.
Step 4: Begin Drawing the Path
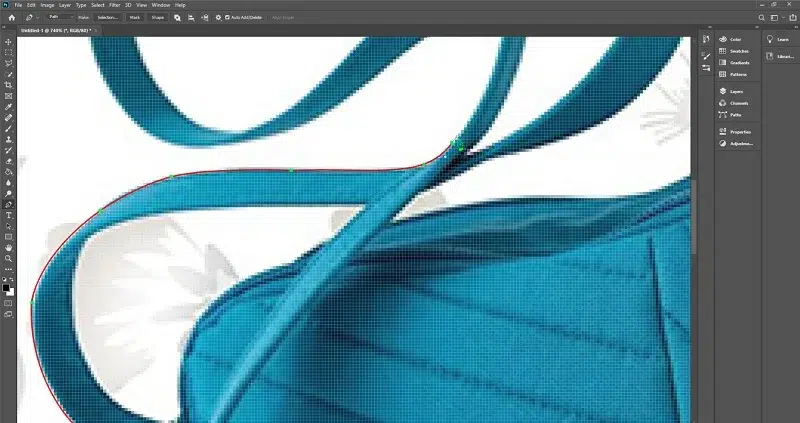
Start outlining the object you want to clip with a path. Click to create anchor points and connect them to form the path. Take your time to ensure precision.
Step 5: Handle Curves with Bezier Technique
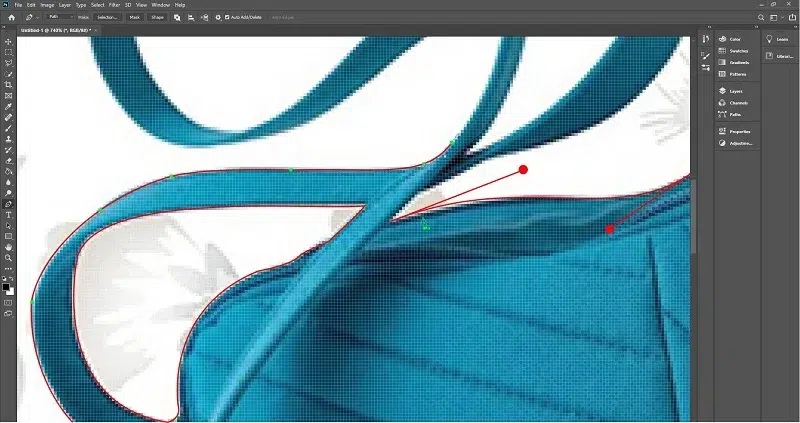
For curved sections, use the Bezier technique. Click and drag to create handles that control the curve. This technique is essential for achieving smooth and accurate paths around curves.
Step 6: Close the Path
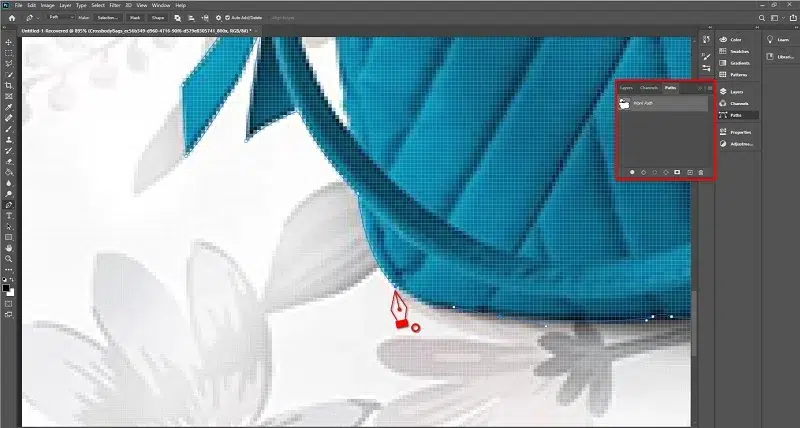
You have to connect the last anchor point to the first one. Enclosing the object within the path is very important.
Step 7: Adjust the Path if Needed
Use the Path Selection Tool to refine the path. Drag anchor points or handles to fine-tune the path, ensuring it closely follows the object’s edges.
Step 8: Check the Path
Double-check the path to ensure it accurately traces the edges of the object. A well-defined path is crucial for a seamless cutout.
Step 9: Create a Selection
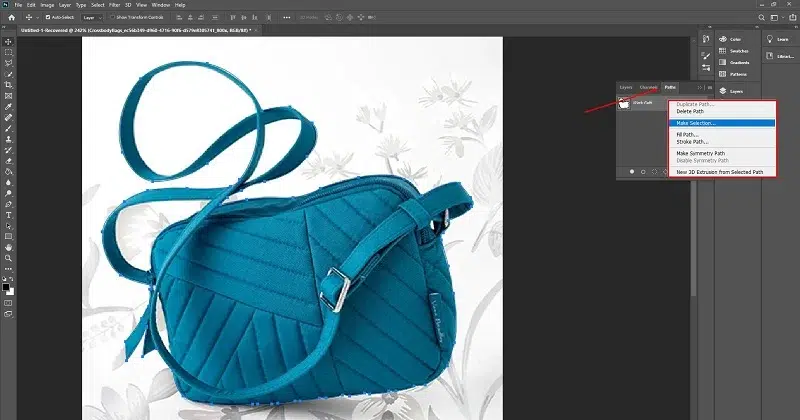
Right-click on the path and select “Make Selection.” This converts your path into a selection, outlining the area to be clipped.
Step 10: Refine the Edges
Go to “Select” and then “Refine Edge” for extra tweaks. This refines edges, giving a sleek finish to your cutout.
Step 11: Save or Use Your Clipped Image
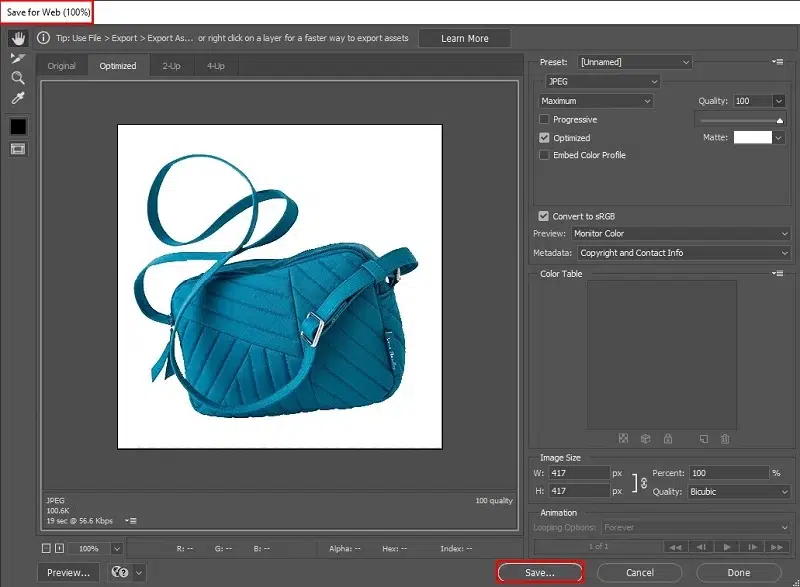
Save your work or incorporate the clipped image into your project. Congratulations! You’ve successfully crafted a perfect Clipping Path in Photoshop. Regular practice will enhance your proficiency in this essential image editing skill.
Why is Clipping Path important?
Let’s break the importance of clipping path. It helps make pictures look amazing by cleaning them up. Here, you will get to know why learning this is a big deal for making your images stand out!
- Clean and Professional Look: Clipping Path gives pictures a professional look by cutting objects precisely. It ensures a polished appearance.
- Background Removal and Options: It easily removes backgrounds, giving the freedom to use pictures in different ways. This flexibility is essential for creative choices.
- Show Products Better: For online shops, it makes product pictures look better by taking away distracting backgrounds, making products stand out.
- Same Look Everywhere: It keeps a consistent look for images, which is crucial for branding and marketing across different places. This uniformity strengthens brand identity.
- Highlighting Subjects in Photos: In photos, Clipping Path isolates main things from backgrounds, making them more noticeable. It draws attention to the focal points.
- Quick and Easy Editing: Clipping Path helps us fix pictures easily, like changing colors, without messing up the main part. This simplifies the editing process.
- Fits Well in Designs: Designers use Clipping Path to smoothly put images into different designs, like ads or websites. It seamlessly integrates images into various layouts.
When to use a Clipping Path
Knowing when to use a Clipping Path is like having a magic trick for your pictures. Whether you’re dealing with product pics or designing cool graphics, we’ll show you when and how to use a Clipping Path to make your images look awesome.
- Product Photography:
In product photos, use Clipping Path to make things stand out by taking away distracting backgrounds. This is super useful for online shops where clean pictures help sell stuff.
- Advertising and Marketing:
Use Clipping Path in ads to make things look super clear and grab attention. It helps a lot, especially in print or online ads.
- Graphic Design Projects:
When working on designs, Clipping Path helps blend images smoothly into different layouts. This makes everything look nice and put together in brochures or banners.
- Website Development:
For websites, Clipping Path is great to keep a consistent and pro look. It makes sure everything looks the same, especially for product images.
- Photo Editing and Retouching:
When fixing pictures, use Clipping Path to adjust specific things without messing up everything. This is handy, especially for portrait photos.
- Product Catalogs and Brochures:
In catalogs and brochures, Clipping Path helps present items with a clean background. It makes everything look good and professional.
- Fashion Photography:
In fashion pics, use Clipping Path to focus on models or specific clothes. It helps make fashion photos look clean and cool.
- Image Manipulation and Creative Design:
For creative projects, Clipping Path is awesome to play around with ideas. It lets designers do cool and unique things by isolating and changing parts of pictures.
Challenges Faced in Clipping Path
Background removal is not an easy work. Many challenges can come in this path. Facing challenges in Clipping Path is like solving puzzles in pictures. This guide explores common problems, like dealing with tricky shapes and tiny details. Join us to understand these challenges and learn easy tricks to make Clipping Path smoother.
- Complex Shapes
Challenge: Dealing with complex shapes can be time-consuming and challenging.
Solution: Use advanced tools like the Pen Tool in Photoshop for precise outlining. Break down complex shapes into smaller sections to maintain accuracy.
- Fine Details
Challenge: Capturing fine details, especially in small areas, can be difficult.
Solution: Zoom in for precision, use smaller brush sizes, and work with patience to ensure accurate outlining of intricate details.
- Hair and Fur
Challenge: Clipping Path becomes challenging with hair or fur due to intricacies.
Solution: Employ techniques like the Refine Edge tool to handle hair and fur more effectively. Experiment with a combination of tools for the best results.
- Transparency and Opacity
Challenge: Maintaining transparency and opacity can be tricky for a seamless blend.
Solution: Adjust the feather and opacity settings carefully. Experiment with layer blending modes to achieve the desired transparency effect.
- Large Batches of Images
Challenge: Managing large batches of images can compromise consistency and precision.
Solution: Develop a systematic workflow, use batch processing tools, and maintain a checklist to ensure consistency across multiple images without sacrificing quality.
- Time Consumption
Challenge: Clipping Path can be time-consuming, affecting efficiency.
Solution: Prioritize tasks based on complexity, use shortcuts, and practice regularly to improve speed without compromising precision. Consider outsourcing for large or time-sensitive projects.
10 Best Clipping Path Service Providers
On the internet, you’ll discover many options when choosing a reliable clipping path company for enhancing your images. Here, I provide a list of the top 10, chosen based on their reputation, quality, and experience. Each clipping factory provides a great image clipping service.
- vectordesign.us
- helloedits.com
- clippingpathshop.com
- clippingpathservice.com
- clippingfactory.com
- clippingpathcenter.com
- zenithclipping.com
- clippingusa.com
- clippingpathstudio.com
- clippingbees.com
If you need a reliable clipping path provider, consider these excellent options. Surely, they will provide satisfying photo editing service.
Conclusion
Clipping Path helps to make pictures look better by cutting out backgrounds . In today’s digital world, where pictures are super important, Clipping Path is a key player. It helps create smooth and eye-catching images, making it essential for businesses and designers. Looking ahead, Clipping Path is likely to get even better with new tools and techniques. As more people want attractive online pictures, Clipping Path will continue to play a big role in making images look great.
FAQs
Q1: What is Clipping Path?
A: Clipping Path is like cutting out a piece in a picture, making it stand alone. People use it in design and photos to make things look neat and focused.
Q2: Why is Clipping Path important?
A: Clipping Path is important because it makes pictures look pro. It cleans up the background, making it perfect for showcasing products, creating cool designs, and giving visuals that wow factor.
Q3: What challenges are faced in Clipping Path?
A: Tricky shapes, dealing with tiny details like hair, and keeping things see-through can be a headache. It needs careful work to get it just right.
Q4: How do I choose the best Clipping Path service provider?
A: Check out their past work, read what others say about them, see how fast they work, and make sure they talk with you well. Test them with a small project before going big.
Q5: When should I use a Clipping Path?
A: Anytime you want to make a product shine, create eye-catching ads, design cool graphics, clean up website images, or jazz up fashion photos, Clipping Path is your go-to.
Q6: What is the future outlook for Clipping Path in visual arts?
A: Clipping Path’s future is bright. With better tools coming, it’ll keep making visuals look amazing. As more people want awesome online pics, Clipping Path stays important for creating standout visuals.

